

Spire of soaring crimson desert: getting into the second Demeniss spire
The Spire of Soaring is the second major spire players are likely to reach in Crimson Desert, sitting in the Demeniss region during the Abyss Islands arc. It is reached after completing the Black and White main quest and defeating Crowcaller the first time, at which point the story routes the player toward Demeniss and a series of moderately difficult puzzles. The location is northeast of Kingshield Mountains, north of Windmere Manor and Whitehill Mill, and slightly southwest of Denn River as the land opens toward the main Crimson Desert. This guide walks through how to get inside, how to clear the interior puzzles, and how to prepare for the second Crowcaller encounter at the top.
Because the spire is built as a multi-stage puzzle gauntlet rather than a single room, it is worth understanding the structure before charging in. The interior is split between a vent-based ascent, a stone-square electricity puzzle, a Skybridge wire puzzle, and finally a boss fight. Each stage has its own failure state and a checkpoint machine that ascends once the puzzle in front of it is solved, so missing one step will usually stall the player until they backtrack to the correct level.
Where to find the spire and the hidden entrance
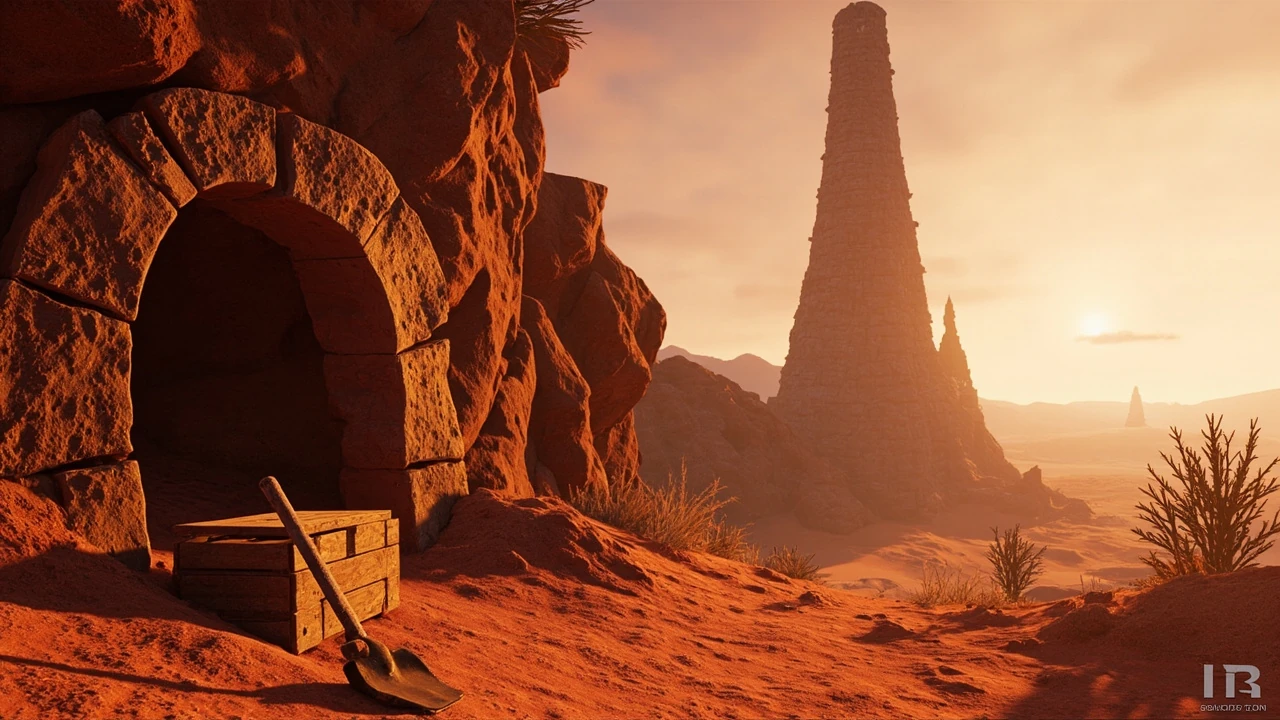
The front of the spire looks like the obvious entry point, but the main door is described as impenetrable regardless of what the player tries. The real route is underground. From the spire’s visible entrance, the player should look southeast along the cliffside in front of the structure. Dropping down off this ledge reveals the alternative entrance, identifiable by a wooden box with a shovel sitting on its right and a small cluster of trees on its left. Facing away from the sealed front door and looking at this lower opening is what marks the correct entry. From that vantage point, another spire is visible in the distance, which is useful for orientation if the player overshoots while sliding down the cliff.
First puzzle: ascending the vent and the Axiom Force shortcut
Once inside, the immediate goal is to climb the stairs and reach the top of a metal grate and vent. The intended approach is to use the flying traversal skill on top of the grate, letting the updraft inside the vent push the player upward until they hit a platform they cannot climb any further by normal means. At that point, the puzzle transitions from a movement challenge into a traversal decision: the upper level of the vent room has a small ledge that can only be reached with Axiom Force. Hitting that ledge and jumping across is what continues the ascent.
A common mistake here is trying to brute-force the climb with regular jumps. The vent itself is the only reliable source of vertical height, and the upper ledge is intentionally placed just out of normal reach. Players who have not yet bound or used Axiom Force should take a moment to confirm the ability is equipped before committing to the vent, because falling back down means starting the climb from the base of the stairs again.
Second puzzle: rotating the stone squares to route electricity
The next room is built around a clear visual hint: something is blocking the electricity in the room, and the temptation is to move the block on the level below. The puzzle actually wants the player to leave that block alone. The fixed path is to rotate the stone squares so that the electricity flowing from the left side of the room also flows into the right side. This requires Axiom Force, and the platform the player stands on will start to ascend the moment the circuit is complete.
The rotation mechanic is corner-based rather than center-based. To turn a square left, the player targets the right corner with Axiom Force; to turn it right, they target the left corner. Trying to hit the center of a square will often produce no useful rotation and can break the player’s rhythm. The intended solution image shows one possible configuration, but the actual requirement is only that the electrical line continues unbroken from the left input to the right output.
Third puzzle: the large circular device and the blue lines
After the first ascent, the same logic repeats on a larger scale. The next chamber contains a large circular device that the player must rotate until three blue lines are formed. As with the stone squares, the player must stay on the ascending platform while doing this, because the platform only carries the player upward when the puzzle is solved. The blue lines are the visual confirmation that the device is correctly aligned; once all three are visible, the platform will move to the top of the spire and the encounter shifts from puzzle to traversal again.
This section rewards patience. Because the platform is moving the moment the puzzle is solved, players who try to admire the result or pre-position themselves for the next jump can find themselves already rising before they are ready. A short, deliberate count after each rotation helps avoid the awkward situation of solving the puzzle and then missing the upward transition because of poor footing.
Fourth puzzle: the Skybridge wire and laser routing
At the top of the spire, the player is carried by a machine into the Skybridge area, where the next puzzle begins. The visual design here is described as deliberately overwhelming, with a lot of vertical detail that looks more threatening than it actually is. The core task is simple: route lasers from orange balls onto blue buttons, then connect any remaining disconnected grey wires to keep the system active.
The first step is to interact with the orange balls and then locate the wire connections elsewhere on the structure. Climbing up the same wall that carries the grey wires is the cleanest route, and players who have access to Axiom Force can also jump from the top of the wires themselves to skip a few hand-over-hand sections. After the second wall and wire set, the player should be at the top with the largest orange ball, which they hit with Axiom Force before redirecting its laser onto the blue button directly in front of it.
From there, the player runs around to the orange ball to the north, which sits on an outside path that does not yet have a laser connection. The same Axiom Force and redirect trick applies. Once both lasers are in place, including the one that was already set by the environment, the player drops to the lower level from the south side and heads east toward the singular grey platform that connects the two paths. Jumping onto it with Axiom Force and then over to the second path gives access to the rear blue button and the next level up, where Axiom Force is used again on the upper platform to keep ascending.
Fifth puzzle: the hidden wire and the circular device
Hopping up to the final Skybridge level reveals two remaining tasks. The first is a disconnected grey wire around the middle of the path between two sets of trees, which is easy to miss because the foliage hides it. The second is another disconnected wire to the west, sitting near a spinning blue device on the grass with a large and a small wire coming out of it, and an orange ball behind it. Both wires must be connected before the central mechanism will respond.
With the wires in place, the player approaches the circular device in the center of the area, hits it with Axiom Force, climbs it, and finishes with an Axiom Punch. This interaction opens the triangular gate that leads forward to the second Crowcaller fight. For additional context, Players who finish the wire puzzle but cannot trigger the central device have usually missed one of the two connections, and it is worth a slow sweep of both tree clusters before assuming the device is broken.
How the second Crowcaller fight compares to the first
The boss at the top of the spire is Crowcaller again, and the encounter is described as essentially the same fight as the first one, only longer. The pattern is evasion during his attack strings to avoid the worst of the damage, and the longer duration is the real threat. Because the fight is extended, players are encouraged to bring a strong stock of cooking recipes so they can outlast him even when they make mistakes.
Useful preparation includes topping up healing food before entering the Skybridge, since the puzzle gauntlet does not give a generous checkpoint, and double-checking that any durability or buff consumables are in the active bar. Players who learned the dodge timing on the first fight will find this encounter familiar, but the additional phases mean fewer safe windows to heal, so it is worth holding cooked food for the back half of the bar rather than burning it on the opening combo.
Loadout and consumable checklist before entering the spire
The spire pulls together three different pressure sources: vertical puzzles that demand Axiom Force, a long boss fight, and a Skybridge section with several fall-damage opportunities. A balanced loadout reduces the chance of restarting the entire sequence because of one bad drop.
- Confirm Axiom Force and any traversal abilities are equipped and bound to an accessible input before climbing the first vent.
- Stock at least two full stacks of the player’s strongest healing cooking recipes, plus one stack of a defensive or damage-reduction dish for the extended Crowcaller phase.
- Bring a small repair or maintenance item for the primary weapon, because the second Crowcaller fight can chip durability over time.
- Carry one movement aid or stamina recovery consumable for the Skybridge section, where repeated jumps between grey platforms can drain the bar.
- Check that fast-travel or checkpoint return is available outside the spire in case the run has to be aborted partway through.
Common failure points and how to read them
Each puzzle in the spire has a clean failure signal, which is useful for debugging when progress stalls. The most frequent issues are around rotation inputs, missed wires, and a premature jump off an ascending platform.
- If the stone squares do not appear to turn, the player is probably hitting the center of a square instead of a corner, or they are off the ascending platform and so the platform will not carry them upward even if the puzzle is solved.
- If the large circular device will not lock into place, the player is most likely targeting it from a position that is not the upper platform, or one of the three blue lines is not fully formed.
- If the lasers do not fire in the Skybridge, at least one of the grey wires is still disconnected; recheck the middle-of-path wire between the trees and the western wire near the spinning blue device.
- If the central circular device at the end of the Skybridge does not respond, the player has likely not connected both hidden wires, even if the lasers look correct.
- If Crowcaller is overwhelming the player, the problem is usually healing economy rather than positioning: ration cooking recipes for the back half of the bar instead of using them during his opening strings.
Practical comparison: spire puzzles versus earlier Demeniss puzzles
The spire’s puzzles escalate the patterns introduced in the earlier Demeniss content, but the underlying logic stays consistent. This makes the spire a reasonable benchmark for how well the player has absorbed the regional mechanics.
| Puzzle element | Earlier Demeniss puzzles | Spire of Soaring | Key adjustment |
|---|---|---|---|
| Electricity routing | Two or three square blocks in a single room | Multi-level stone squares plus a large circular device | Always rotate from corners, never the center |
| Vertical ascent | Climbable walls and small vents | Long vent with an Axiom Force shortcut | Confirm Axiom Force is equipped before entering the vent |
| Wire and laser routing | Single wire per room, no moving platforms | Multiple orange balls, blue buttons, and hidden grey wires on the Skybridge | Slow sweep both tree clusters before assuming the circuit is complete |
| Traversal risk | Short fall distances | Long drops between Skybridge platforms | Carry a stamina recovery consumable for repeated jumps |
| Encounter at the end | Mid-tier enemy or miniboss | Second Crowcaller fight, longer than the first | Stock two stacks of healing food plus a defensive dish |
What the spire sets up for the rest of Demeniss
Completing the spire does not end the Demeniss arc, but it does move the player from the second of three regional spires into the late-game puzzle density. The same set of abilities, Axiom Force, Axiom Punch, and the flying traversal skill, are reused across the remaining content, so a clean run through this spire is also good practice for what follows. Players who consistently forget which corner of a square to target with Axiom Force will have a frustrating time in later rooms that build on the same rotation logic.
The checkpoint machine at the top of the spire, the one that carried the player from the circular device room to the Skybridge, also serves as a soft save between the puzzle gauntlet and the boss. As long as the player does not die on the Skybridge before triggering the central device, they will respawn close to the triangular gate, which keeps the second Crowcaller attempt from requiring a full puzzle re-run.
Step-by-step summary of the spire run
For players who want a single condensed reference, the full sequence can be reduced to a short ordered list. The list mirrors the actual structure of the spire and should be read top to bottom, because every step depends on the previous one being complete.
- Reach the spire entrance northeast of Kingshield Mountains, north of Windmere Manor and Whitehill Mill, southwest of Denn River.
- Drop southeast along the cliffside to the underground entrance near the box with a shovel.
- Climb the interior stairs and use the flying skill on the grate and vent to ride the updraft upward.
- Use Axiom Force on the upper level to reach the ledge that the updraft cannot reach on its own.
- Rotate the stone squares by their corners so electricity flows from left to right, and ride the ascending platform up.
- On the next level, rotate the large circular device until three blue lines are formed, then ascend again.
- Board the transport machine at the top to enter the Skybridge area.
- Interact with the orange balls, climb the walls with the grey wires, and redirect the first laser onto its blue button.
- Run around to the second orange ball on the outside path and redirect its laser as well.
- Drop to the lower level from the south, use Axiom Force on the singular grey platform, and climb toward the next level.
- Connect the hidden grey wire between the trees, then the western wire near the spinning blue device.
- Activate the central circular device with Axiom Force, climb it, and finish with Axiom Punch.
- Move through the triangular gate, heal up, and engage the second Crowcaller fight with a full bar of cooking recipes.
Signposting and orientation cues inside the spire
Because the spire is large and visually loud, it is easy to lose track of which puzzle is currently active. A few orientation cues help, especially for players who leave mid-run and come back later.
| Location inside the spire | What confirms the player is in the right place | Most common reason players think they are lost |
|---|---|---|
| Underground entrance | Box with a shovel on the right, trees on the left, second spire visible in the distance | Approaching the sealed front door instead of dropping southeast along the cliff |
| Vent room | Metal grate and a strong updraft; upper ledge visible but out of reach | Trying to climb without the flying skill or without Axiom Force |
| Stone squares room | Electricity entering from the left, clear visual block below | Moving the block below instead of leaving it and rotating the squares |
| Circular device room | Large disc on the ascending platform, three blue line indicators | Targeting the center of the disc instead of its edges |
| Skybridge, first laser | Large orange ball at the top, blue button directly in front | Climbing the wrong wall and missing the wire path |
| Skybridge, second laser | Outside path with no laser connected yet, orange ball to the north | Forgetting to drop to the lower level before crossing the singular grey platform |
| Skybridge, hidden wires | Two sets of trees with a hidden wire between, spinning blue device to the west | Connecting the visible wires and assuming the system is complete |
| Crowcaller arena | Triangular gate that opens after the central device is hit twice | Attempting to enter before the Axiom Punch is applied to the central device |
Why the spire feels different from a typical puzzle room
Most puzzle rooms in Crimson Desert up to this point are designed to be solved in one sitting, with the puzzle, the platform, and the exit all visible in a single camera angle. The spire deliberately breaks that pattern. It splits the puzzle across multiple vertical levels, separates the rotation logic from the traversal logic, and then adds a boss on top of a Skybridge with its own routing puzzle. The result is a structure that rewards players who slow down and read each room before committing to a movement path, rather than players who try to brute-force the ascent with repeated jumps.
For developers and technical players, the spire is also a useful study in how the game communicates failure. Each puzzle stage has a clear, narrow failure state, and the platform ascends only on success. This makes the puzzle readable even when the visual noise of the Skybridge tries to obscure the solution. It is a good example of using movement and camera direction, rather than text prompts, to teach the player the rule set.
Final reminders before starting the spire
The Spire of Soaring is a self-contained challenge that rewards preparation over improvisation. Players who walk in with a full healing bar, both traversal abilities confirmed, and a clear sense of which corner of each square to hit will move through the spire in one continuous run. Players who try to wing the rotation puzzles or who forget the hidden wires on the Skybridge will spend most of their time backtracking between vertical levels. Take a slow first pass through the vent, commit to corner-only rotation inputs, and save the cooking recipes for the back half of the Crowcaller fight. For the location, the entrance, and the puzzle sequence, the Spire of Soaring puzzle walkthrough on IGN covers the same flow with the official puzzle image references. For broader quest context, the Precipice of Truth in Crimson Desert guide covers another main-quest turning point in the same region.
Frequently asked questions
Where is the Spire of Soaring in Crimson Desert?
The spire is in the Demeniss region, northeast of Kingshield Mountains, north of Windmere Manor and Whitehill Mill, and slightly southwest of Denn River as the land opens toward the main Crimson Desert. The front door is sealed, so the actual entrance is along the cliffside to the southeast of the spire’s front.
How do I get inside the spire?
From the spire’s visible entrance, look southeast along the cliffside and drop down. Facing away from the sealed front door, the underground entrance is in front of a box with a shovel on the right and some trees on the left. Another spire is visible in the distance from this lower spot, which is useful for orientation.
When does the spire become available?
The spire becomes available after completing the Black and White main quest and defeating Crowcaller for the first time, which routes the player toward Demeniss and its three regional spires. The Spire of Soaring is the second of those three spires.
What abilities do I need for the spire puzzles?
The puzzles require Axiom Force for the stone-square rotations, the large circular device, and several Skybridge jumps. The flying traversal skill is used on top of the vent grate to ride the updraft, and an Axiom Punch finishes the central circular device on the Skybridge. Confirm all three abilities are bound and ready before entering the spire.
How do I solve the stone-square electricity puzzle?
Leave the block on the level below alone, then rotate the stone squares so electricity flows from the left side of the room to the right side. Use Axiom Force on the corners of the squares rather than the center; to turn a square left, target its right corner, and to turn it right, target its left corner. The platform will start ascending the moment the circuit is complete.
What is the trick to the large circular device?
Stand on the ascending platform and rotate the large circular device until three blue lines are formed. The device only locks when those three lines are visible, and the platform will carry the player upward the moment the configuration is correct.
How do I solve the Skybridge laser puzzle?
Climb the walls with the grey wires, hit the orange balls with Axiom Force, and redirect the lasers onto the blue buttons. There are two lasers to set up this way, plus one that the environment already provides. Then drop to the lower level from the south, cross the singular grey platform with Axiom Force, and connect the two hidden grey wires: one between two sets of trees, and one near the spinning blue device to the west.
Where are the hidden grey wires on the Skybridge?
One wire is in the middle of the path between two sets of trees and is easy to miss because the foliage covers it. The other is to the west, near a spinning blue device on the grass with a large and a small wire coming out of it, and an orange ball behind it. Both must be connected before the central circular device will respond.
How hard is the second Crowcaller fight?
The second fight uses the same patterns as the first Crowcaller encounter but runs longer, so healing economy is the deciding factor. Players should bring two full stacks of their strongest healing cooking recipes plus a defensive dish, and save the back half of their healing bar for the later phases where dodge windows are shorter.
What should I do if a puzzle does not seem to respond?
First confirm you are on the correct platform; the rotating and ascending puzzles only trigger when the player is standing on the moving platform. If the Skybridge lasers do not fire, recheck both hidden grey wires. If the central circular device will not open the triangular gate, make sure both Axiom Force and Axiom Punch have been applied to it. Slowing down and tracing the circuit visually is usually faster than re-entering the puzzle room from the bottom.

Leave a Reply